Deploy a Smart Contract Using Hardhat
Hardhat is a powerful development environment for building smart contracts on the Ethereum blockchain. Whether you're new to blockchain development or an experienced developer, Hardhat can help you build better, more reliable smart contracts.
In this tutorial, you will learn how to set up Hardhat and use it to build, test and deploy a simple smart contract on ShimmerEVM.
Pre-requisites
Create the Project
Let's start by creating a new node project:
mkdir projectname
cd projectname
Initiate npm:
npm init -y
Install hardhat:
npm install --save-dev hardhat
Now, let's create a new hardhat project. Run in your project root:
npx hardhat
The sample project used here comes from the Hardhat Quickstart guide, as well as its instructions.
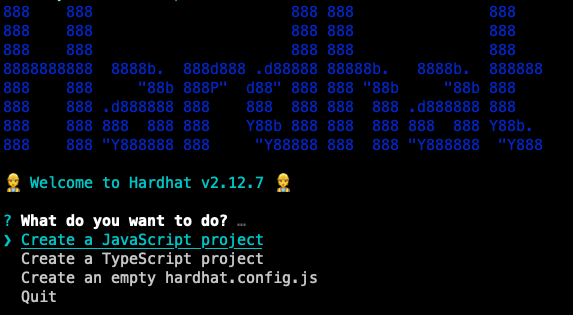
You should see the following prompt:

Choose the JavaScript project and go through these steps to compile, test and deploy the sample contract.
If you're comfortable with typescript, feel free to select it. There's not much difference for this project. However, some syntax might differ.
Your hardhat project should look like something this:
.
├── README.md
├── contracts
│ └── Lock.sol
├── hardhat.config.js
├── package-lock.json
├── package.json
├── scripts
│ └── deploy.js
└── test
└── Lock.js
Check the Contract
The contracts folder contains Lock.sol, which is a sample contract which consistis of a simple digital lock, where users could only withdraw funds after a given period of time.
// SPDX-License-Identifier: UNLICENSED
pragma solidity ^0.8.9;

// Uncomment this line to use console.log
// import "hardhat/console.sol";

contract Lock {
    uint public unlockTime;
    address payable public owner;

    event Withdrawal(uint amount, uint when);

    constructor(uint _unlockTime) payable {
        require(
            block.timestamp < _unlockTime,
            "Unlock time should be in the future"
        );

        unlockTime = _unlockTime;
        owner = payable(msg.sender);
    }

    function withdraw() public {
        // Uncomment this line, and the import of "hardhat/console.sol", to print a log in your terminal
        // console.log("Unlock time is %o and block timestamp is %o", unlockTime, block.timestamp);

        require(block.timestamp >= unlockTime, "You can't withdraw yet");
        require(msg.sender == owner, "You aren't the owner");

        emit Withdrawal(address(this).balance, block.timestamp);

        owner.transfer(address(this).balance);
    }
}
The above is an auto-generated smart contract by hardhat. You can replace it with your own smart contract. If you want to understand what the smart contract does, it's a Lock contract, which will lock funds for a specific time period and allows withdrawals only past that point.
Some important things to note are data types. event means that we can subscribe to it like a webhook and wait for a ping to the client side whenever a withdrawal is triggered with emit from inside the function withdraw().
Set Up the Contract
- Go to
hardhat.config.js - Update the
hardhat-configwith shimmer network details as shown below:
module.exports = {
  solidity: '0.8.18',
  defaultNetwork: 'evm-testnet',
  networks: {
    'evm-testnet': {
      url: 'https://json-rpc.evm.testnet.shimmer.network',
      chainId: 1073,
      accounts: [priv_key],
    },
  },
};
How to export the MetaMask private key of an account?
Click on the logo in the upper right corner
Select the account you want to export
On the account page, click the menu (three dots) in the upper right corner, then click the "Account Details" button:
Click "Export Private Key"
To access your private key, you will now need to enter your wallet password. When done, click Confirm to continue.
Your private key will now be displayed. Click to copy it and save it in a safe place. (Note: For obvious reasons, we didn't show it in the screenshots below - but yours will be there.)
Click close icon on top to close the screen.
Follow this article for further detail.
- Create a
.envfile in the project root to store your network id and jsonrpc if you want to keep it private. You can then refer to them byprocess.env.SHIMMEREVM_TESTNET_JSONRPC.
Note that the file above requires DOTENV to manage environment variables and ethers and etherscan. Make sure to install all those packages.
Find more instructions on how to use DOTENV in the DOTENV npm package.
Compile the Contract
To compile the contract, you first need to install the Hardhat Toolbox package:
npm install --save-dev @nomicfoundation/hardhat-toolbox
Then, simply run to compile:
npx hardhat compile
Deploy Your Contract on ShimmerEVM
Run this command in root of the project directory:
npx hardhat run scripts/deploy.js --network evm-testnet
The contract will be deployed on EVM Testnet, and you can check the deployment status here on the explorer.
If you want to further verify your contract, add the following to your hardhat.config.js:
etherscan: {
  apiKey: {
    'evm-testnet': 'ABCDE12345ABCDE12345ABCDE123456789',
  },
  customChains: [
    {
      network: 'evm-testnet',
      chainId: 1073,
      urls: {
        apiURL: 'https://explorer.evm.testnet.shimmer.network/api',
        browserURL: 'https://explorer.evm.testnet.shimmer.network/',
      },
    },
  ],
}
Then you can verify by running:
npx hardhat verify --network evm-testnet <address> <unlock time>
You can easily copy the address and unlock time from the output of the deploy step above
And Voila! You've successfully deployed your first Hardhat Smart Contract on ShimmerEVM and verified it on explorer.