Deploy a Smart Contract
You can deploy your smart contracts to any of your EVM chains using popular tools like Remix and Hardhat.
This guide will deploy the Counter contract you can find in
the How to Create a Basic Solidity Contract Guide.
- Remix
- Hardhat
Deploying a Solidity smart contract using Remix is a straightforward process that doesn't require any installation or setup of development environments on your machine. Remix is a powerful, browser-based IDE that allows you to write, compile, and deploy smart contracts.
1. Connect to Metamask
Before you get started, make sure you have connected Metamask to your network of choice.
You can check the connection details in the Networks & Endpoints section.
- IOTA EVM
- IOTA EVM Testnet
- ShimmerEVM
- ShimmerEVM Testnet
2. Access Remix IDE
Open your web browser and navigate to Remix IDE.
3. Create Your Smart Contract
- In the
File Explorertab on the left, click theCreate New Fileicon. - Name your file
Counter.sol. - Copy the Solidity code for the basic counter smart contract and paste it into
the
Counter.solfile you just created in Remix.
4. Compile Your Smart Contract
- Navigate to the
Solidity Compilertab on the left sidebar. - Select the appropriate compiler version that matches the version specified in your contract (
^0.8.6or similar). You might need to enable "Auto compile" or click the "Compile" button manually. - If there are errors, Remix will display them, and you'll need to correct them before proceeding.
5. Deploy Your Smart Contract
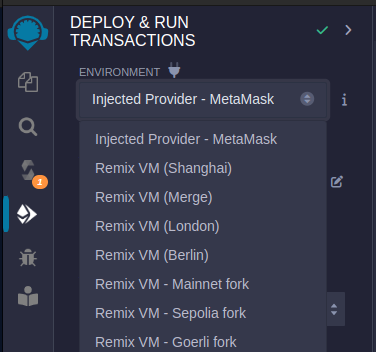
Switch to the "Deploy & Run Transactions" tab on the left sidebar.
In the "Environment" dropdown, select and select
Injected Web3from theEnvironmentdropdown.
After selecting the environment, make sure the contract Counter is selected in the
Contractdropdown.Click the
Deploybutton. If you're using an Ethereum network, confirm the transaction in your Web3 wallet.
6. Interact with Your Deployed Contract
Once deployed, the contract instance will appear under the Deployed Contracts section.
Here, you can interact with your contract by calling its functions. For the Counter contract, you'll see buttons to call
its increment, decrement, and getCount functions directly from Remix.
The first thing you'll need to deploy a smart contract using Hardhat is to set up a Hardhat project. Here's a step-by-step guide:
Requirements
1. Set Up Hardhat
Open a new terminal window.
Create a new directory for your project, and navigate into it. For example:
mkdir deploy-a-basic-contract &&
cd deploy-a-basic-contract
Create a new node project by running:
npm init -yInstall Hardhat by running:
npm install --save-dev hardhatCreate a Hardhat Project by running the following command:
npx hardhatSelect "Create a basic sample project" when prompted and answer the setup questions (you can just press enter to accept defaults).
2. Add Your Contract
- Inside the
contractsfolder, create a new file calledCounter.soland paste the content of the Counter Basic Contract.
3. Create a Deployment Script
Navigate to the
scriptsfolder.Create a new file called
deploy.jswith the following code:async function main() {
const Counter = await ethers.getContractFactory("Counter");
const counter = await Counter.deploy();
await counter.deployed();
console.log("Counter deployed to:", counter.address);
}
main()
.then(() => process.exit(0))
.catch((error) => {
console.error(error);
process.exit(1);
});
4. Compile and Deploy Your Contract
- Add your preferred network parameters to the
hardhat.config.js, for example:
- IOTA EVM Testnet
- ShimmerEVM Testnet
- IOTA EVM
- ShimmerEVM
networks: {
    'iotaevm-testnet': {
        url: 'https://json-rpc.evm.testnet.iotaledger.net',
        chainId: 1075,
        accounts: [YOUR PRIVATE KEY],
    },
}
networks: {
    'shimmerevm-testnet': {
        url: 'https://json-rpc.evm.testnet.shimmer.network',
        chainId: 1073,
        accounts: [YOUR PRIVATE KEY],
    },
}
networks: {
    'iotaevm': {
        url: 'https://json-rpc.evm.iotaledger.net',
        chainId: 8822,
        accounts: [YOUR PRIVATE KEY],
    },
}
networks: {
    'shimmerevm': {
        url: 'https://json-rpc.evm.shimmer.network',
        chainId: 148,
        accounts: [YOUR PRIVATE KEY],
    },
}
Currently, there is no validation service available for EVM/Solidity smart contracts on IOTA Smart Contracts, which is often offered through block explorer APIs.
Compile your contract by running the following command:
npx hardhat compileIf you have no compilation errors, you can deploy your contract by running the following command:
npx hardhat run scripts/deploy.js --network evm-testnetExpected output:
Counter deployed to: 0x123456789ABCDEFGHIJK123456789ABCDEFGHIJK*
0x123456789ABCDEFGHIJK123456789ABCDEFGHIJKis the contract unlock address.You can verify your contract by visiting the EVM Testnet Explorer, and searching for the address from the previous step. If you access the
Contracttab, you should be able to see your code and interact with your contract.